After installation, the main T-Minus Ten window will be displayed. There are four tabs in the window:
T-Minus Ten launches your Macintosh into new realms of automation. Configure hot keys and hot spots to drive applications, scripts, and documents. Set up a schedule to provide off-hours auto-pilot for running back-up scripts or downloading stock quotes. Post reminders of important events, such as birthdays and anniversaries. In fact, anything you can open or script can be automated with T-Minus Ten.
It is recommended that you use Mac OS 8.1 or later. However, you can use any system software as far back as System 7.5.
If you use Mac OS 8 or earlier, you MUST install Appearance 1.0.2 or later. Appearance is a new control panel from Apple that provides developers with a richer and more consistent set of user interface gadgets (like buttons, popup menus and icons). You can download Appearance 1.0.2 from the T-Minus Ten Download Page.
If you use Mac OS 8.1 or later, you already have the appropriate Appearance control panel.
The software is comprised of two components: an application (T-Minus Ten) and an extension (T-Minus Ten Extension). You will use the application to create tasks and to monitor the entire system. The extension enables all the back-end handling of tasks and schedules. You don't have to install the extension - it is built into the application and will be installed automatically the first time you run T-Minus Ten.
Users of Mac OS 8.0 and earlier must install Appearance 1.0.2 or later. You can download Appearance 1.0.2 from the T-Minus Ten Download Page.
The T-Minus Ten folder can be placed anywhere on your hard disk.
The first time you run T-Minus Ten, it will perform some additional installation by creating a T-Minus Ten Extension in your Extensions folder, creating a T-Minus Ten Data folder in your Preferences folder, and disabling any previous version of T-Minus Ten.
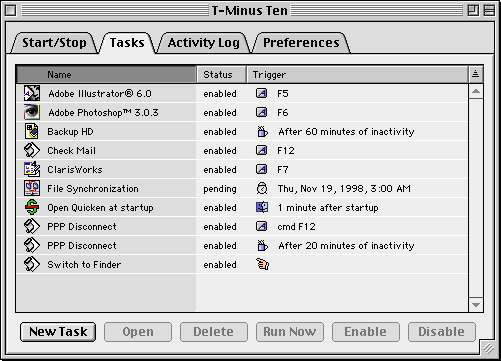
After installation, the main T-Minus Ten window will be displayed. There are four tabs in the window:
The Start/Stop panel indicates whether or not the system is active. Tasks will automatically run only when the system is active. The system should already be on. If not, press the Start button to enable the system.
The Tasks panel displays a list of all your tasks. It indicates which tasks are enabled and when they run. This panel is where you will do most of your work.

![]() To create a new Task, click the New Task button. Then
follow these directions.
To create a new Task, click the New Task button. Then
follow these directions.
![]() To modify a task, select it and click the Open button
(or choose Open Task from the Task menu or double click it). The task setup
window will be displayed. Change the task as desired and then press the
Update button.
To modify a task, select it and click the Open button
(or choose Open Task from the Task menu or double click it). The task setup
window will be displayed. Change the task as desired and then press the
Update button.
![]() To remove a task, select it and click the Remove button
(or choose Remove Task from the Task menu or press the delete key).
To remove a task, select it and click the Remove button
(or choose Remove Task from the Task menu or press the delete key).
![]() To run a task immediately, select it and click the
Run Now button (or choose Run Now from the Task menu).
To run a task immediately, select it and click the
Run Now button (or choose Run Now from the Task menu).
![]() To indefinitely suspend a task, select it and then
press the Disable button (or select Disable Task from the Task menu). When
disabled, the task will never run but will remain in the task list. To
enable the task, press the Enable button (or select Enable Tasks from the
Task menu).
To indefinitely suspend a task, select it and then
press the Disable button (or select Disable Task from the Task menu). When
disabled, the task will never run but will remain in the task list. To
enable the task, press the Enable button (or select Enable Tasks from the
Task menu).
![]() To view the error message for a task that has failed,
select the task and then select Show Error from the Task menu. The nature
of the error will be displayed.
To view the error message for a task that has failed,
select the task and then select Show Error from the Task menu. The nature
of the error will be displayed.
![]() To reveal a task file in the Finder, select the task
and then select Show in Finder from the Task menu.
To reveal a task file in the Finder, select the task
and then select Show in Finder from the Task menu.
Any file or AppleScript can be turned into a task. If the file is an application or document, it opens the file. If the file is an AppleScript, it runs the script. To create a task, do one of the following:
![]() Select New Task from the File menu
Select New Task from the File menu
![]() Click the New Task button in the task panel
Click the New Task button in the task panel
![]() Drag a file into the task panel
Drag a file into the task panel
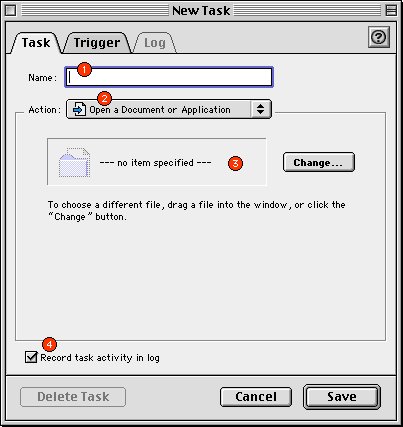
A new Task Setup window will be displayed.

Specify a name for the task. If you leave this blank, the task will
be identified by the name of the file used by the task (step 3 below).
Pick the action the task should take (open a document, launch an application,
or run an AppleScript).
Drag a file or AppleScript into the window or click Change to select
the file to be used by the task.
If you want the task to appear in the Activity
Log, make sure the Record task activity check box is checked.

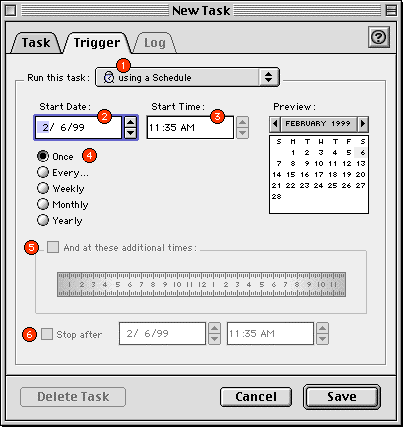
Select the trigger that initiates the task. These include using a
schedule, at system startup, at system shut down, when idle, when a hot
key is pressed, and when a hot spot is entered.
Select the date that your schedule should become effective.
Select the time of day your task should run.
If you want the task to run more than once, click one of the radio
buttons labeled Every, Weekly, Monthly, or Yearly.
 |
Selecting the Every option lets you create a schedule that repeats at a specific number of minutes, hours, days, or weeks. | |
 |
Selecting the Weekly option lets you create a schedule that repeats every week. You can pick multiple days. This example show a schedule that repeats every Monday and Thursday. | |
 |
Selecting the Monthly option lets you create a schedule that repeats every month. You can pick multiple days. This example show a schedule that repeats every 1st and 15th of the month. | |
 |
Selecting the Yearly option lets you create a schedule that repeats every year. You can pick multiple months. This example show a schedule that repeats every 3 months (in January, April, July, and October). |
![]() If you've selected Weekly, Monthly, or Yearly, you can also specify
multiple times of the day to run your task (in addition to the time specified
in the Start Time field). To specify additional times, click the check
box labeled And at these additional times.
If you've selected Weekly, Monthly, or Yearly, you can also specify
multiple times of the day to run your task (in addition to the time specified
in the Start Time field). To specify additional times, click the check
box labeled And at these additional times.

Select the time or times of day to run the task by clicking in the time line area.
![]() To add a new time, click anywhere on the time line
and drag the marker to the desired time.
To add a new time, click anywhere on the time line
and drag the marker to the desired time.
![]() To change an existing time, drag the marker to a new
location.
To change an existing time, drag the marker to a new
location.
![]() To remove a time, drag it out of the time line area.
To remove a time, drag it out of the time line area.
![]() If you want the task to be disabled after a certain date, click the
Stop After check box and then enter a date.
If you want the task to be disabled after a certain date, click the
Stop After check box and then enter a date.
When you have finished setting up the schedule, press the Save button. After a brief moment, the scheduled task should appear in the Task panel.
Note: Once you have scheduled a task, you do not have to leave the T-Minus Ten application open. You can close it. Your task will still run at its designated time.
Enter the number of minutes after system startup that the task should
be automatically run. Specifying zero means that the task should run as
soon as possible after the system starts up. This is usually shortly after
the Finder starts appearing on the desktop.
Run a task at system shut down
There are no additional settings for shut down tasks. They will run shortly after you initiate a system shut down.
Enter the number of minutes after after your computer has become idle
that the task should be automatically run. Specifying zero means that the
task should run as soon as possible after becoming idle.
Run a task when a hot key is pressed
Press the key combination to be used for the task. You can also click
on the "modifier" keys.
Run a task when a hot spot is entered

This window displays a miniature your desktop. The hot spot is indicated by a yellow rectangular marker. The hot spot is the area inside the yellow marker.
Drag the marker to any location on the desktop.
Click the magnifying glass button to view the desktop at a larger
size. This allows you to see more detail. The desktop will scroll when
your drag the hot spot marker beyond the edge.

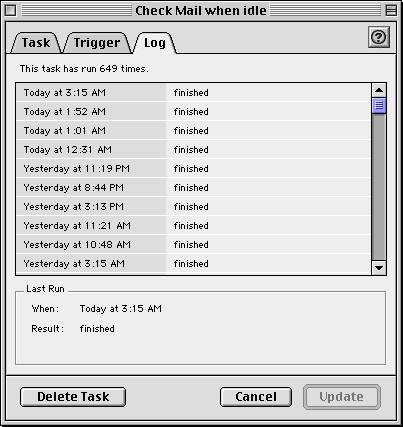
The Activity Log keeps a history of the tasks that T-Minus Ten has run on your computer. Use of the log is optional. Initially the log is turned on. By default, the log will keep up to 200 entries and will remove entries older than 7 days. You can customize your log using the preference panel.
![]() To remove an entry from the log, select it and click
the Delete button (or choose Delete Entry from the Log menu or press the
delete key).
To remove an entry from the log, select it and click
the Delete button (or choose Delete Entry from the Log menu or press the
delete key).
![]() To remove all entries from the log, click the Delete
All button (or choose Delete All from the Log menu).
To remove all entries from the log, click the Delete
All button (or choose Delete All from the Log menu).
![]() To view an entry's task in the Task panel, select
the task and then click the Show Task (or choose Show Task from the Log
menu).
To view an entry's task in the Task panel, select
the task and then click the Show Task (or choose Show Task from the Log
menu).
You can also view the activity log of a single task from the task's Task Setup window.

If you want the Apple menu to blink while a task is running, check
the Blink the Apple menu check box.
If you want sounds to be played when a task runs, click the appropriate
check box and select a sound.
The activity log can be restricted to a maximum number of entries.
By default, this value is set to 200, meaning that the activity log will
only retain the most recent 200 entries. If you leave this field empty
or set it to zero, then there is no restriction on the number of entries
in the log.
The log can also be restricted to a maximum number of days. By default, this value is set to 7 days, meaning the activity log will only retain entries from the past seven days. If you leave this field empty or set it to zero, then the activity log will retain all old entries (within the limits set for the maximum number of entries).
Normally, if your computer is turned off when a scheduled task is
to run, the task will get resheduled to run at the next time specified
by its schedule. The activity log will indicate that the task could not
be run because your computer was turned off. If you would prefer that these
tasks be run as soon as your computer starts up, click the Run the task
when your computer starts up checkbooks.
Sometimes your computer may be too busy to run a task when it is suppose
to run. In these cases, T-Minus Ten will continuously attempt to run your
task, but only for the time period specified in the Retry field.
If the task can not be run in this time period, it will be logged in the
activity log as failure due to your computer being too busy.
![]() Open the Start/Stop panel. If the system is running
press the Stop button to turn it off.
Open the Start/Stop panel. If the system is running
press the Stop button to turn it off.
![]() Once the system has stopped, quit the T-Minus Ten application.
Once the system has stopped, quit the T-Minus Ten application.
![]() Remove the T-Minus Ten folder you installed.
Remove the T-Minus Ten folder you installed.
![]() Remove the T-Minus Ten Extension from your Extensions folder.
Remove the T-Minus Ten Extension from your Extensions folder.
![]() T-Minus Ten also created a folder in your Preferences folder that
you will want to remove. It is named "T-Minus Ten Data".
T-Minus Ten also created a folder in your Preferences folder that
you will want to remove. It is named "T-Minus Ten Data".
![]() T-Minus Ten may have created a file in your Shutdown Items folder.
If so, remove it.
T-Minus Ten may have created a file in your Shutdown Items folder.
If so, remove it.
T-Minus Ten is shareware. It is not free. If you find it useful, please register and pay the nominal US$20 shareware fee. Every time you use an unregistered copy of T-Minus Ten, you will be reminded to register your copy. Follow the on screen instructions for information about registering online via the Internet or registering via printed form. If you prefer to register later, close the Register window. You can always get back to it by selecting Registration Info from the File menu.
Payment is made through the Kagi shareware payment service. Kagi accepts cash, checks drawn on U.S. funds, credit cards, and First Virtual payments. To register electronically, visit the T-Minus Ten Online Order Processing web page. To learn more about the Kagi payment system, visit their web page at http://kagi.com.
Questions concerning T-Minus Ten should be e-mailed to mk@kagi.com.
© 1998-99 Mark Krenek. All Rights Reserved.